
I am going
to preface this (again) by saying I do not consider myself skilled in home
projects by any means! I’ve been asked quite a few times and twice now in the
last week about my cabinet painting process so I figured I should at least
attempt to document it in one place and not just have all the bits of info all
over my laptop.
Sometime
last year I finally decided to take the plunge and paint my kitchen cabinets
white. Here is the before:


And here is
the after:


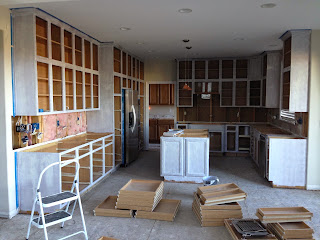
You may have noticed that while painting the cabinets, I also took the moulding all the way up to the ceiling. It was a request by my husband and, in retrospect, a very smart one. It made such a difference in the space, because there was no longer a shelf to collect dust and it made you appreciate the actual height of the entire room. You may have also noticed that this isn’t the kitchen in my Instagram photo. The week I was finishing this project, my husband called and told me that the bank approved an offer we had made on a house many many months before. We had decided after submitting the offer that we were silly for doing so. Then when the bank said they were willing to go lower in price, we suddenly found ourselves reconsidering. I know our home is “just a house”, but I honestly wanted to cry because I had put so much effort into our current house at the time. Even more discouraging? The kitchen of the house we were thinking of moving into:

We ended up
moving which meant the next few months were spent updating our “new” kitchen.
All this to say, while I am not an expert I have had quite a bit of experience
painting cabinets in this last year!
After doing a
lot of reading, I decided to use the following:
1. Paint Brand: Benjamin Moore Advance
* This is on the expensive side, but I bought it with a
coupon and for a space that would be used daily and a project I was doing
myself, I felt it was worth it. I paid $40/gallon.
* It is a water-borne paint. I read oil-based paint can
yellow over time and is also difficult to use. Perhaps neither is true, but as
an amateur I didn’t want to take the risk.
* It is self-leveling
* It has a great open time
* When it cures, it hardens really well
2. Paint Brush: Sherwin Williams Premium XL Tight Spots 2” angled
brush
3. Paint Roller & Cover: Jumbo-Koter" Frame With Chrome Plated Shank 14
and Wooster RR314-4-1/2 Jumbo-Koter Micro Plush Roller Cover, 4-1/2"
* Most websites I read recommend a small foam roller. I
tried that on some laundry room cabinets and preferred how the paint dried when
applied with the micro plush roller. Just a personal preference.
4. Paint Color:
* 1st kitchen: Benjamin Moore White Dove – I had read all
over the internet that this was one of best “creamy white” colors out there. I
didn’t want cream, but I didn’t want stark white, either. So I went with White
Dove.
*2nd kitchen: Benjamin Moore Chantilly Lace – After using
White Dove, I wasn’t 100% satisfied with the color. I’m not sure if it was the
undertones of the countertops or the dark cherry wood underneath, but it was
creamier than I wanted. So I tested a few more colors and decided on Chantilly Lace.
It was still creamy but very slightly and definitely whiter than White Dove.
Again, here is how our current
kitchen looked when we bought it:

And here it is after we updated it:

Although I may have cried once or
eight times while refinishing the cabinets and drawers of this second kitchen,
I am so much happier with the Chantilly Lace than the White Dove that it may
have been worth it. There may be better processes, but here is what worked for
me:
1. Number
cabinets and drawers


2. Remove
cabinet doors and drawers

3. Remove hardware (i.e. hinges)


3. Remove hardware (i.e. hinges)

4. Degrime all
frames, cabinet doors, and drawers with a cleaner-degreaser


5. Sand all
frames, cabinet doors, and drawers
· I used 220 grit sand paper and an electric
hand sander


6. Vacuum and/or wipe all dust from sanding
7. Degloss all frames, cabinet doors, and drawers with a liquid sander/deglosser
· This is probably overkill. Every website
& blog I’ve read said you either need to sand or degloss. But I am paranoid
as well as a glutton for punishment.
8. Prime frames
– 1st coat

9. Prime
cabinet door backs & drawers – 1st coat
· To save money, I bought a large pack of plastic big red cups to hold each cabinet and drawer while they dried. Painters triangles are sold for about $5 for a pack of ten. The plastic cups worked perfectly for me and were a definite cost saver!


· To save money, I bought a large pack of plastic big red cups to hold each cabinet and drawer while they dried. Painters triangles are sold for about $5 for a pack of ten. The plastic cups worked perfectly for me and were a definite cost saver!


10. Wait the
recommended drying time
11. Prime
cabinet door fronts – 1st coat
12. Wait the
recommended drying time
13. Repeat steps
#8-12 as many times as desired
· I did 2 coats on each side for each kitchen I
painted
14. Paint frames
– 1st coat
15. Wait the
recommended drying time
16. Paint
cabinet door backs & drawers – 1st coat
· I would first paint the corners and crevices
with the brush and then quickly follow with the roller over the flat surfaces
of the door or drawer
17. Wait the
recommended drying time
18. Repeat steps
#14-17 as many times as desired
· For my current kitchen, I did 5 coats. Again,
I am crazy.
19. Paint
cabinet door fronts – 1st coat
· I painted each door back completely before
painting each door front so that I did not have to lay the door on its front
after painting.
20. Wait the
recommended drying time
21. Repeat step
#19-20 as many times as desired
· For my current kitchen, I did 5 coats. Still
crazy.
22. Add hardware
23. Add hinges
& reassemble
24. Enjoy!
The first kitchen I painted had
nice smooth cherry wood cabinetry. Painting them was fairly simple, because it
wasn’t “grainy”. Getting the edges and grooves, however, made it a little
challenging. I didn’t want to see any brush strokes. Here is a video of how I painted
the cabinet doors to minimize brush strokes for an even application.
A friend of mine had a few estimates done to have white kitchen cabinets installed. I believe the estimates ranged from $48,000 to $120,000. Including the kitchen, laundry, and butler's pantry, I painted about 98 cabinets and drawers for about $200. This really was the only way I would be able to justify getting my white kitchen. Although I didn't realize how labor-intensive the project would be, it was so worth it to me. (Of course, I say that now after it's all done and I don't have to sand, prime, or paint another cabinet door!)
I know white kitchens aren’t for
everyone, but I am personally very drawn to them. My mom cringed when I painted
over the dark cherry wood cabinets at my previous house. Fortunately, it was a huge selling point for the eventual buyers. I love how bright,
cheery, and clean the space looks and feels with white cabinetry. It's very "happy". :) Since the
rest of the house has a lot of wood tones, I like how the
kitchen complements it in a light and airy way. It's so inviting and almost makes me love
to cook. Almost. :)
If anyone stumbles upon this post wanting to do the same, I hope this encourages you in some way! It took me months to take that first step. Being a huge homebody, I love coming home to a place that now makes me (& my family) happy.
If anyone stumbles upon this post wanting to do the same, I hope this encourages you in some way! It took me months to take that first step. Being a huge homebody, I love coming home to a place that now makes me (& my family) happy.


